To update the main software, just switch on NGen with the rotary encoder pressed down. If you connect NGen though USB, it will be detected as USB drive with the partition name "Boot Loader".
There's one (virtual) file in the root folder named "firmware.bin". Just delete this file, then copy the new binary (must be BIN format, name doesn't matter) to the root folder.
This should take only a second or two. After that, switch off/on NGen to return to normal operation.
While the main software can be programmed through USB via the secondary bootloader, intially the boot loader has to be reprogrammed.
As it's not a part of the main microcontroller project, this is a bit tricky. Yet there are two principal ways: through JTAG/SWD or through UART.
I would recommend this only if you want the absolutely cheapest solution and are not interested in developing/debugging NGen.
All you need for this is a UART/TTL converter. Typically you'd use some USB to TTL UART adapter but try to avoid fake FTDI ICs.
5V are OK, 3.3V are better but don't use a real RS232 which uses +/-12V as this would destroy the CPU.
Download and install FlashMagic
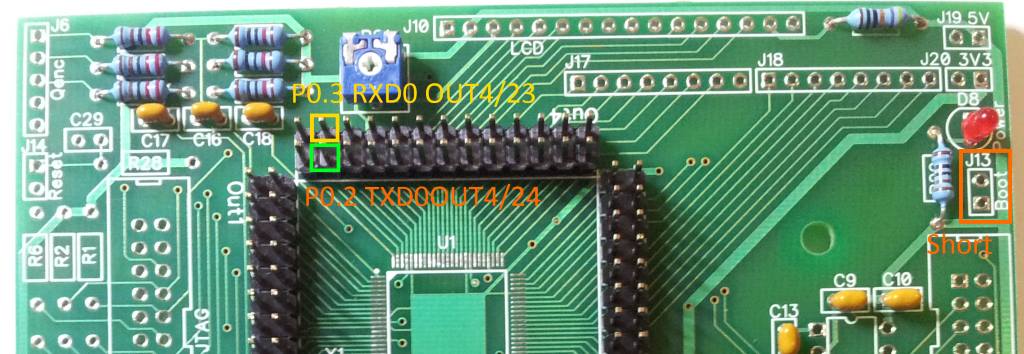
Connect a UART/TTL converter to the pins OUT4/23 (PC:Tx, NGen:Rx) and OUT4/24 (PC:Rx, NGen:Tx)
Switch on NGen with "Boot" (J13) jumper shorted (but remove the short afterwards)
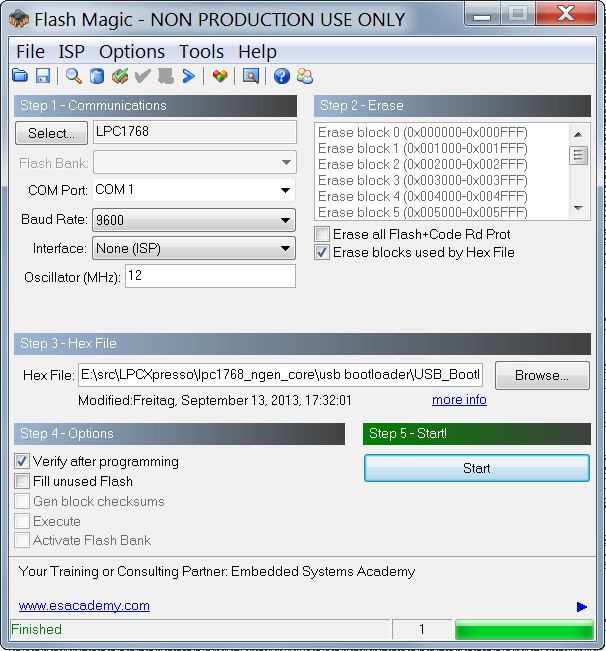
Start FlashMagic
Set:
9600 Baud
Interface: None(ISP)
Oscillator: 12MHz
Select "Erase block used by hex file"
Select "USB_Bootloader.hex" as Hex file.
Select "Verify after programming"
Press "Start"
If you want to develop/debug NGen or any other project using a ARM Cortex microcontroller, I'd recommend to get a debug interface.
I started with a Segger J-Link EDU (~50€), but after switching from Coocox to LPCXpresso, I prefer to use a LPC Link 2 (17€).
At least for NXP LPC microcontrollers, this is by far the cheapest and most convenient debugging solution.
Due to flexible firmware support, it can be used either as generic CMSIS DAP debugger or Segger J-Link and last but not least it can serve as MPC4370 evaluation board.
So I'd recommend to get a LPC Link 2 which is e.g. available at Voelkner and Watterott.
Since the LPC Link 2 features a 10pin JTAG/SWD connector while NGen uses the default 20pin one, you'll also need an adapter.
Again Voelkner and Watterott provide you with what you need.
There's also a different adapter available e.g. at Exp Tech which is better to use with NGen for mechanical reasons, but you need an additional 20 pin IDC cable then.
Probably the easiest approach to reprogram the boot loader is again using FlashMagic.
Download and install FlashMagic.
Remove JP1 on LPC Link 2
Reconnect LPC Link 2 to USB (remove & connect)
Wait until drivers are installed (detected as "LPC")
Start FlashMagic
Set
Interface: SWD over Link2
Oscillator: 12MHz
Select "Erase block used by hex file"
Select "USB_Bootloader.hex" as Hex file.
Select "Verify after programming"
Press "Start"

If you intend to debug/develop NGen you need to download LPCXPresso anyway, so the following might be the most appropriate solution.
Note: to actually debug program >8k, you need to activate LPCXpresso, which is for free but you still need to register.
I think that for bootblock reprogramming you don't need to register/activate, but then again, if you install LPCXpresso, you usually want to register/activate anyway.
Download and install LPCXpresso
Open a command shell (CMD) in the "bin" folder of the LPCXpresso installation
Remove JP1 on LPC Link 2
Reconnect LPC Link 2 to USB (remove & connect)
Execute:
boot_link2.cmd
crt_emu_cm_redlink -flash-load-exec "[myfolder]\USB_Bootloader.bin" -g -2 -vendor=NXP -pLPC1768 -load-base=0x0000 -reset=vectreset -flash-driver=LPC175x_6x_512.cfx
You need to exhange [myfolder] with the location of the bootloader of course. Note that you have to use the bin file here, not the hex.
There is at least a third way to flash the bootblock with LPC Link 2 and though this seems to be the least interesting way, I still mention it for sake of completeness.
Download and install LPScrypt
Download and install Segger Software and documentation pack
Remove JP1 on LPC Link 2
Reconnect LPC Link 2 to USB (remove & connect)
In the LPScrypt installation folder, execute
.\scripts\program_JLINK.cmd
Place JP1
Reconnect LPC Link 2 to USB (remove & connect). It's detected as J-Link now.
Execute JFlashLite.exe from the Segger J-Link installation folder.
The program is a bit wacky, if you have a >100% DPI setting, it hard to see what you need to do at the beginning, so in a nutshell:
Press Return (2x), Select NXP in upper combobox, select LPC1768 in lower combobox, press OK (increase window if button is not visible), press OK.
In "Data File" select "USB_Bootloader.hex".
Press "Program Device"